FailCar's Peugeot 205 GTi: An update

The car that twitter helped build, is nearly finished...
I thought I should do an update on where I have got to on the 205 since it was introduced to PetrolBlog.
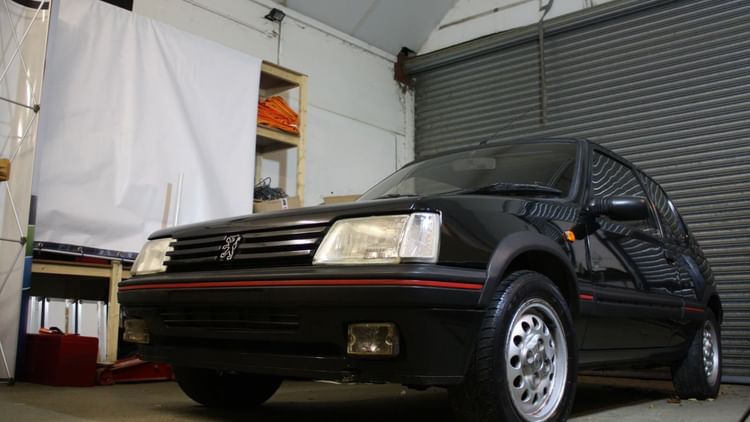
Since my last post a frankly ridiculous amount of time was spent in the barn with orbital buffer and various cutting/refining compounds to get the paint back up and fresh while removing 20 years worth of it being ‘cleaned’ with a bucket and sponge. The swirl marks were pretty horrendous and just took patience and time to get sorted.

I took to the interior with just some foaming cleaner and gave the plastics a clean up with some Turtle Wax interior product. Without too much effort the interior looks pretty mint. I also polished the glass inside and out with Autoglym Glass polish.


Like I said before the immediate things that needed attending to were the front fog lights which were rusted to dust and the red strip on the passenger door which was stolen. Turns out to get the original ‘Sigma’ fogs cost a small fortune so I managed to source some ‘Denji’ ones from GSF car parts. They pretty much look exactly the same apart from a different pattern on the glass.

Very easy to fit with just one bolt and a cable that I fed up into the engine bay with a piece of masking tape. A stroke of genius I think you will agree. They look much better than the rusted up originals which fell apart upon removal. I also had to replace a cracked indicator unit which was a pretty quick straight-forward job.

The red side strip I sourced cheaply via eBay and was a major faff to fit. Mostly because I couldn’t figure out how to get the thing on properly and the Haynes manual and owner forums as ever were pretty useless. My girlfriend came up to look at the car one day and after 15 minutes of looking the red-trim was on. This was both joyous and depressing as I shall NEVER hear the end of that.

With the faded trim I had previously used a Turtle Wax trim-dye product which worked very well but just did not have a brilliant longevity. A search on some of the detailing forums and many personal recommendations pointed me in the direction of G-techniq. I was very wary at first purely because this stuff costs £36 for a shot glass sized amount! I bit the bullet and purchased some.
Firstly I had to clean up the plastics and G-techniq recommended that I use isopropyl alcohol. For some reason this was a pain in the arse to find but thanks to @PawnSacrifice on twitter, I managed to get some from Maplin.
Once it was all cleaned up I taped off the bodywork with masking tape and began to apply the G-tecniq to the plastics. I was very impressed with it and surprised how far such a small amount would go. I did the whole car and used less than a ¼ of the tiny bottle. Water now beads on the plastics and apparently this stuff only needs re-applied every 2-3 years.

Next up was sorting out a dripping sunroof. Thankfully the seals were fine but the actual handle that ‘bolts’ into the glass was letting in some water. Back to the land of twitter and @dover_nige kindly suggested that I get hold of some Captain Tolleys Creeping Crack Cure. Great stuff, it’s a water-based sealant and after a few applications and letting it dry (it’s white but dries clear) it seems to have worked. Great stuff and not messy like a botched silicone seal.

With the bodywork and trim all clean I decided to start on the protection process. So on top of a base of Poorboys Black Hole glaze and Poorboys Professional polish I began to apply some R222 wax. I did a good hunt around for waxes before and for the price this stuff seemed to be pretty decent. You have to wait 24 hours between coats for it to work effectively so that was five one-two hour evening sessions right there. Looked really good after the wax and I added a topping of Collinite insulator wax as recommended by @Matt_WaxDaddy. Now I had to attend to some issues with the bonnet.
Like pretty much every 205 the lacquer is knackered on my GTi and so I decided to attempt to restore it rather than just go straight for the ‘easy’ respray route. I started off with wet-sanding and this takes quite a while with such a large area. I then started to use a cutting compound made by 3M. I concentrated hard on one area of the bonnet and it did make a huge improvement.
Sadly though it was far from perfect and it’s pretty pointless to go through all that effort on the car to have a bonnet with looks that let everything else down. The difference between random orbital sanders and rotary sanders is that orbitals are idiot-proof but will not be able to get a really hard cut like a rotary when needed. So the efforts with my orbital where pretty futile for the required level of correction. The crazing was pretty bad and after spending a long time trying to salvage it I realised that it looked like it was just going to have to be a full respray job.

No, I’m NOT going to fit 1.9 alloys seems to be something I have to say quite a lot with my 1.6 and so a quick re-furb of the rims was in order. The front right wheel was heavily kerbed so I decided to check if the spare was any good. It had been hanging underneath the car for around 20 years, so I couldn’t really tell as it was so filthy. An evening spent with Bilberry wheel cleaner and a pressure washer revealed it was pretty mint so I swapped them over. The rest of the rims were in pretty decent nick. The only let-down was the centre area which had gone a bit corroded. A quick (two hour) wet sand and a bit of lacquer and the wheel came up much better.


The tyres on the car were pretty crap in fact I think one of them may have been original. So I started the hunt for some new tyres that were decent but not going to break the bank. After getting advice via (you guessed it...) twitter I decided on some Toyo Proxes and at £30 a corner from Camskill it was job done. Local garage owner randomly turned out to be a hardcore (classic) Pug fan and as such fitted and balanced everything for £20. Bargain.
Near the Garage was a bodyshop so while I was there I decided to pop round and see if he could sort the bonnet and also fit and spray the tailgate I had sourced via ebay. Again unbelievably this guy was a massive GTI fan and had even re-built several of them from bare shells. We were discussing cars for around two hours and eventually got round to actually discussing fixing my car. We figured out what was required and I went away to find them.
It was very hard to source a decent bumper and I spent a long time looking around. Buying one new from Peugeot was out of the question as it was horrendously expensive. I was then informed by an old friend that builds the odd rally car that Spoox motorsport make perfect GTI replica bumpers for £50. Sorted.
So what’s happening now? Well the 205 is in the bodyshop and as you can see there are a couple of bits missing. The old tailgate has been removed and the one I sourced via ebay has had all the minor dings filled and it’s been primed ready for spraying. The bonnet has been removed and is currently awaiting spraying. As always when removing parts from a French car the bumper bolts were seized and just snapped on removal, so I had to order some new ones which won’t arrive for a few days. The end is in sight though and soon it shall be finished so, you know, watch this space...


